
Passport Size Photo Maker
Upload Your Photo
Supports JPG, PNG, WEBP
How to Make a Passport Size Photo
Getting a perfect passport picture usually means a trip to a local photo studio. Now you can easily prepare your own standard photos right from your computer or phone. This Passport Size Photo Maker helps you turn any regular portrait into a perfectly sized document photo ready for online applications or physical printing.
Instead of guessing the right dimensions or struggling with complex photo editing software, you can use this simple tool. It takes care of the exact pixel calculations and print layouts so you can focus on getting the right crop.
What This Passport Size Photo Maker Does
This tool works entirely in your web browser to format your pictures securely. You can upload a portrait and instantly resize it to standard official dimensions.
It provides an interactive workspace where you can zoom and drag your photo to align your face perfectly. You can also adjust the colors, apply a custom border, and compress the final image to a specific file size. Once your single photo is ready, the tool can arrange multiple copies onto a single sheet of paper for easy home printing.
Step-by-Step Instructions
Follow these simple steps to prepare your document photo.
- Open the Passport Size Photo Maker tool.
- Click the upload box or drag and drop your photo into the area.
- Select your required photo dimensions from the settings panel.
- Drag the image inside the preview area to center your face.
- Use the zoom slider to make your face fit the required space.
- Adjust brightness or add a border if needed.
- Choose your download format and click Download Single Photo.
- If you need physical copies, use the Create Print Sheet section.
Choose the Required Photo Size
Different applications require different photo sizes. The tool includes standard presets like 35 × 45 mm which is widely used for standard passports and 51 × 51 mm for US visas.
If your specific application requires unique dimensions, simply select the Custom Size option. You can enter the exact width and height you need in millimeters, centimeters, inches, or pixels. The tool automatically recalculates the exact pixel output based on your selected Print DPI. A standard 300 DPI is recommended for high quality prints.
How to Crop and Position a Photo
Proper facial alignment is the most important part of a document photo. After uploading your image, you will see it inside the editor workspace.
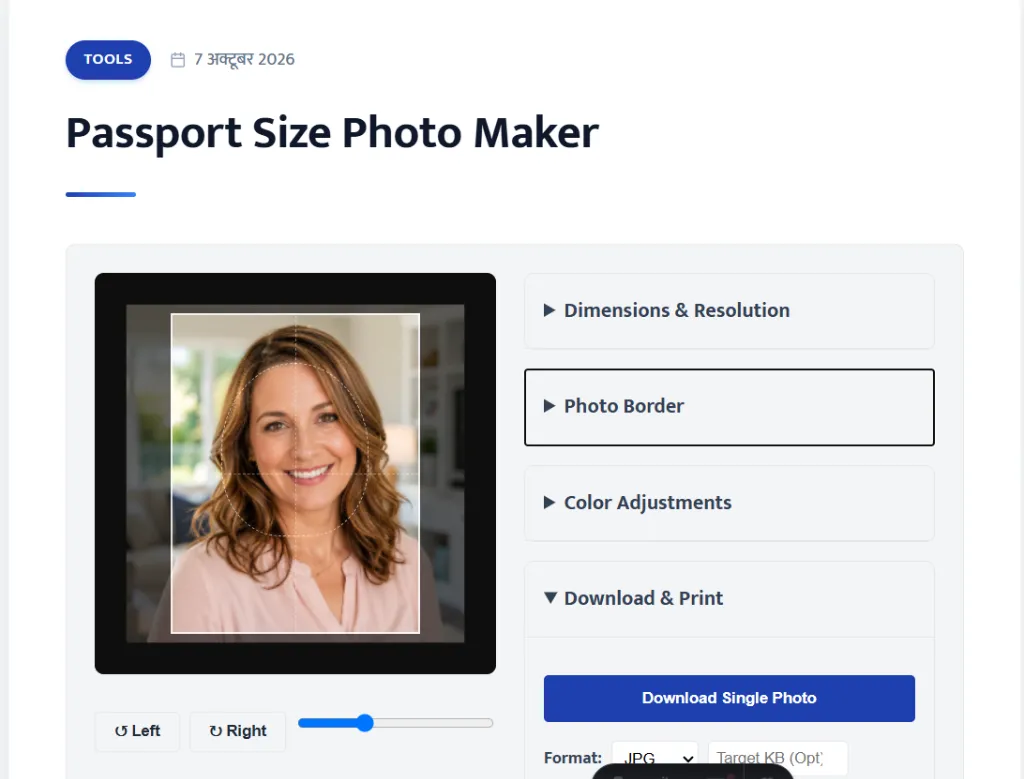
You can click and drag the image in any direction to adjust the crop. Use the zoom slider below the canvas to shrink or enlarge the photo. If your original picture was taken sideways, use the Left and Right rotation buttons to fix the orientation.
To help you position your face accurately, leave the Show Face Guides option checked. This places a transparent oval over the canvas. Simply adjust your zoom and position until your face fits naturally inside the oval and your eyes align with the center guides.
Adjust Colors and Photo Border
Sometimes a photo looks too dark or washed out. Open the Color Adjustments section to find simple sliders for Brightness, Contrast, and Saturation. Moving the brightness slider slightly forward is a great way to make a poorly lit face look much clearer.
Many official applications require a distinct border around the photo. You can open the Photo Border section to add one. Set the thickness slider to your desired width and click the color box to choose a border color. Black is the most common choice. This border is drawn inside the photo edges so it never alters your required physical dimensions.
How to Download the Final Photo
When your digital photo looks correct on the screen, look at the Download and Print section. You can choose to download the image in JPG, PNG, or WEBP format.
If you are filling out an online form that restricts the file size, you can use the Target KB option. Simply type your maximum allowed file size like 50 into the box. When you click Download Single Photo, the tool will intelligently compress your JPG or WEBP image to stay under that limit while maintaining the best possible quality.
How to Print Multiple Passport Photos
Printing a single small photo on a large sheet of paper wastes valuable ink and paper. The Create Print Sheet feature solves this by arranging multiple copies of your finished photo into a neat grid.
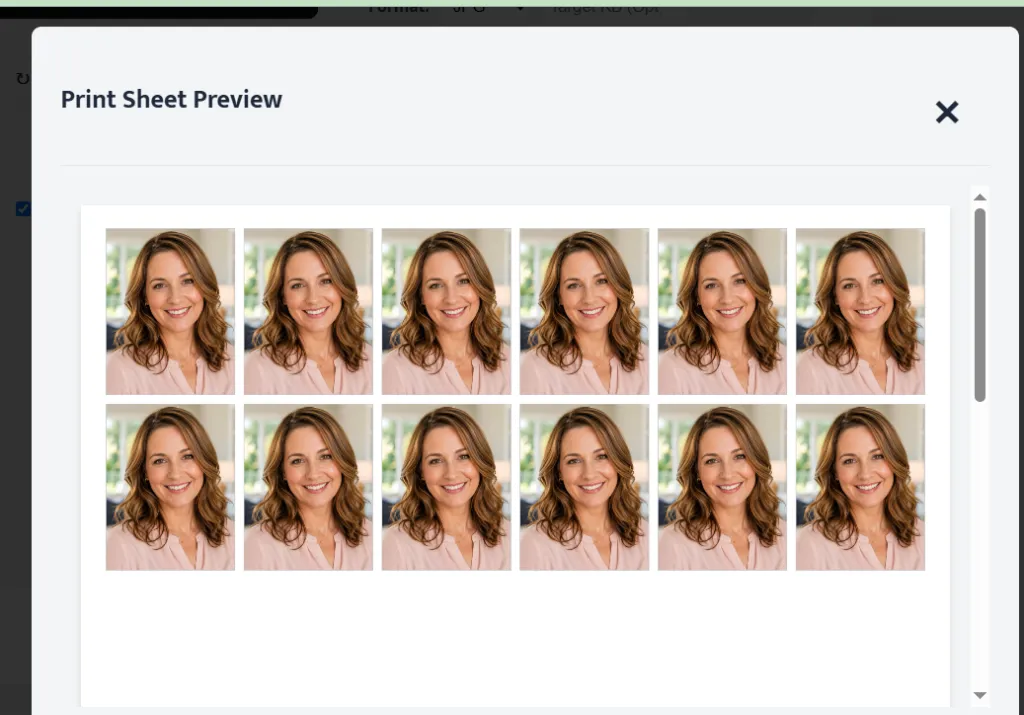
Select your paper size between standard A4 and US Letter. Then choose how many copies you want. If you select Auto Fill Page, the tool will pack as many photos as possible onto the sheet. Click Preview Print Sheet to see exactly how it will look. Light cutting lines are automatically drawn around each photo to help you trim them straight with scissors later.
From the preview screen, you can click Download Print Sheet to save the full page as a JPG file or click Direct Print to send it straight to your connected printer.
Practical Use Cases
Preparing a photo for a job application or school admission is incredibly easy with this tool. You can select the 30 × 40 mm preset, adjust your brightness, and download a crisp digital copy for your email resume.
If you need physical copies for official paperwork, you can upload a photo taken against a plain wall, set it to 35 × 45 mm, and generate an A4 sheet with 6 copies. You can print this directly on glossy photo paper at home and cut them out, saving you a trip to the local studio.
Common Problems and Solutions
Photo upload failure
Make sure your image is a standard JPG, PNG, or WEBP file. Extremely large or corrupted files might not load properly.
Face positioned too high or too low
Click and hold your mouse or finger directly on the photo preview and drag it up or down until your face is centered.
Low image quality
If your downloaded photo looks blurry, ensure your Print DPI is set to 300 or 600. Also check that your original uploaded photo is reasonably clear and not heavily compressed.
Printable sheet not generating
If your custom photo dimensions are larger than the selected paper size, the sheet cannot be created. Ensure you are using standard small dimensions like 35 × 45 mm before generating a print sheet.
Frequently Asked Questions
What is a Passport Size Photo Maker?
It is a simple web tool that lets you upload a normal portrait, crop it to precise official dimensions, and save it as a digital file or a printable sheet.
How do I crop a photo to passport size?
Upload your image, choose your required dimensions from the preset list, and drag the photo inside the preview box until your face is centered.
Can I choose custom photo dimensions?
Yes. Select Custom Size from the preset menu and enter your exact required width and height in millimeters, centimeters, or inches.
Can I print multiple passport photos on one sheet?
Yes. The tool includes a Create Print Sheet section that automatically arranges your finished photo in a grid on A4 or Letter sized paper.
Can I change the background of a passport photo?
This tool does not automatically remove backgrounds. For the best results, you should take your original photo standing in front of a plain white or light blue wall.
Can I download the photo in JPG format?
Yes. You can select JPG, PNG, or WEBP from the format dropdown before clicking download.
Does the tool guarantee official photo requirements?
No tool can guarantee official acceptance. You must always check the specific rules of your government authority and ensure your expression, lighting, and background meet their strict guidelines.
Conclusion
Whenever you need a document photo with precise dimensions, you can use this Passport Size Photo Maker to prepare your image quickly using the available settings. For more useful online tools and related government updates, we encourage you to search Google for Sarkari Place and explore the latest resources on our website.